AKG HiQNet DLL Plug-in ã Harman International (India) Pvt. Ltd.
Getting started with AKG 'Wireless Mode'
Properties for Wireless Channels.
Ribbon Tab for Wireless - Live Mode
AKG´s HiQnet plug-in automatically identifies all HUB4000Qs connected to a HiQnet® system. The channel-oriented user interface provides intuitive control of all parameters of the wireless channels. With the unique 1 Click Setup frequency coordination can be done with a single click. It performs an Environment Scan, calculates the discrete and intermodulation free frequencies and programs them into the wireless receivers.
1 Click Setup Expert offers an advanced frequency coordination mode, with which restricted TV-channels and non AKG wireless frequencies can be included in the calculation.
Additional tools including Device Manager and Programmer Guide, helps in managing complex wireless systems easily.
· Audio Architect aligned new work flow
· 'Wireless Mode' ribbon tab to work on AKG wireless microphone system solutions [products]
· Device presentation on venue for all AKG products
· Separate venue tab to perform operations on AKG wireless products.
· Grid like presentation for live monitoring of important parameters of all wireless channels.
o Update/change properties like Frequency, Name
o Highlight important channels by increasing the height of row
o Specific property tab 'IVM operations' for In-Ear monitoring products
o Locate, Mute, On/Off operations
o Meters to show RF, AF & Battery level
o Iconic representation to show online/offline status
o Launch firmware update utility for AKG products.
· 'Frequency View' venue tab is added for performing frequency related operations.
o Graphical representation of installed wireless channels
o Environment Scan operations: Start, stop, clear, open, save, print
o Perform loop scan
o Launch 'One Click Setup' utility to perform exclusive frequency calculation for installed wireless channels
o Show intermodulation products on graph
· Real time RF level monitoring.
o Navigate to any random channel for monitoring.
· Location Management Mode
o TV Channel database based on postal codes
o User defined Proximity
o TV channel frequency ranges can directly been used in frequency calculation
o Neighboring country TV channels in case of larger proximity
o User can select/deselect channels used in frequency calculation
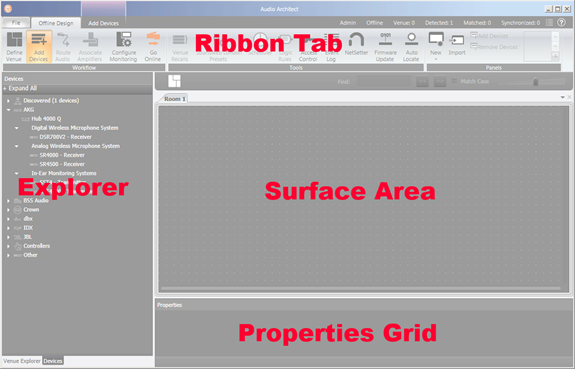
Figure 2. Audio architect major components
The application is logically split into four major regions.
1. Ribbon Tab: This contain various types of buttons; Toggle Button, Radio Button, etc. to perform operations.
2. Explorer: Audio Architect presents different explorers, the important ones are 'Venue Explorer' and 'Device Explorer'. All HiQNet compatible Harman products are listed in 'Devices' explorer, in the form of tree control.
3. Surface Area: This area is to carry out more focused operations like Venue design, Audio Routing, etc. Also used to show Grids, Custom Panels, Device Panels in the form of tabs.
4. Properties Grid: User can change/modify various values from this region. Common user input controls like Textbox, Sliders, Buttons, Dropdowns, etc. are provided for user inputs. The various tabs are provided, each represents logical grouping of specific operation.
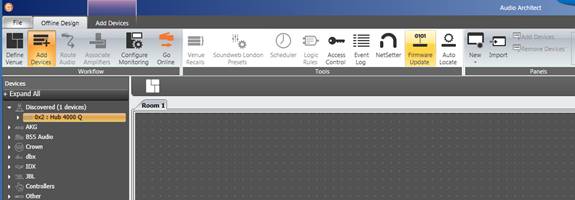
AKG HiQnet compatible devices are listed in 'Devices' explorer as shown in fig. 3. AKG WMS products are imperative component of Harman Professional Audio sound chain.
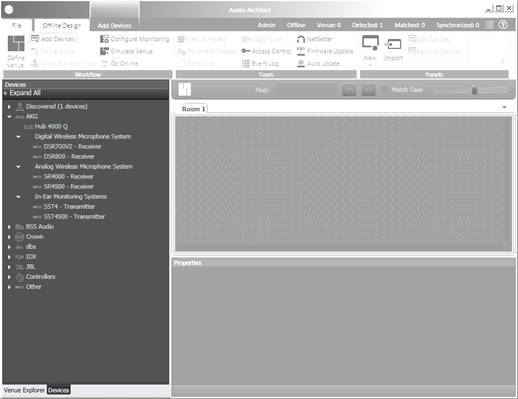
1. HUB4000Q: Currently AKG WMS products are not directly HiQnet compatible. To connect these WMS products, HUB4000Q is used as intermediate device. It is the first entry in AKG device tree.
2. DSR700V2: Two channel wireless receiver for digital transmitters (microphones).
3. SR4000 & SR4500: Analog type wireless receiver.
4. SST4 & SST4500: Transmitters used for In-Ear monitoring System.
There is one more node called 'Discovered', it lists all type of online devices which are detected by Audio Architect. It can list only AKG HiQnet compatible device, i.e. HUB4000Q.
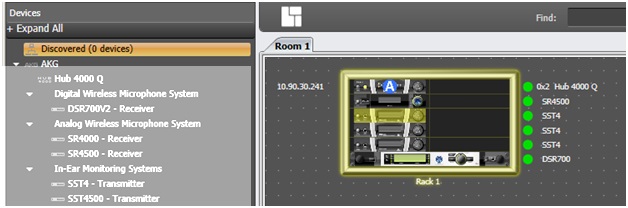
Fig. 4 shows a typical slot connections available on HUB. User can connect 8 AKG non HiQnet devices to one HUB. Every HUB has one HiQnet connection which user can use to connect HUB to HiQnet LAN.

In Audio Architect(AA) AKG non-HiQnet device (devices) is associated to any HUB present on the venue means it is connected to either of any 8 slot available.
If user drags and drops discovered HUB to the venue, the rack will populate HUB as well as all the devices connected to the slots. Steps are as follows...
· Select any HUB from 'Discovered' node of 'Devices' explorer.
· Drag and drop selected HUB to the venue ('Room' venue tab, Surface Area)
· Operation populates a rack along with HUB and devices connected to HUB as shown in Fig. 5
· Note that the dropped HUB will be removed from 'Discovered' node.
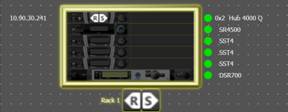
· In Fig 5. The dropped HUB have...
o Name: Hub 4000 Q
o Node Address: 0x02
o IP Address: 10.90.30.241
o Matched Indicator: Green LED
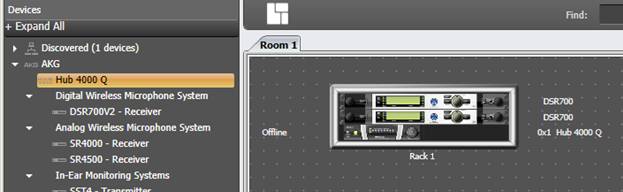
· If you select any HUB associated device (apart from HUB) in the rack then an association icon ![]() get highlighted as shown. The association is done automatically based on information from online HUB.
get highlighted as shown. The association is done automatically based on information from online HUB.
The same procedure can be done on offline devices, in this case user needs to perform association manually. Steps to perform device to hub association for offline devices are...
· Drag and drop HUB (Hub 4000 Q) from 'AKG' node to the venue.
· Drag and drop any device from AKG node to the venue.
· To add multiple devices (same type of devices) on to the venue, perform drag-drop operation using right click. As shown in Fig. 6.
· Click on properties tab from Properties Grid area.
· Click on any non-HiQnet AKG device from any rack, the properties grid populates association properties as shown in Fig. 7
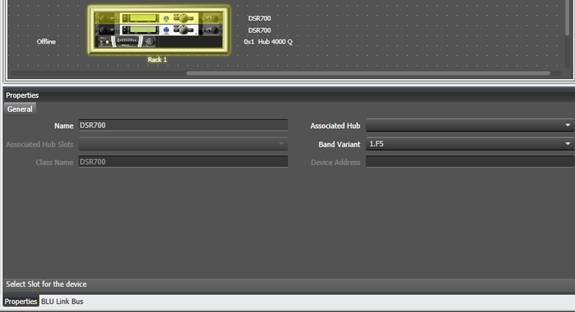
· Properties are: Associated Hub, Associated Hub Slot, Band Variant, Class Name, Device Address.
· Associated Hub dropdown only populate offline hubs added on venue.
· User can select any of the hub from given options, once selected Slots dropdown gets enabled for user to choose any slot from 1 to 8.
· Once user selects slot, association to hub is done. The association icon gets highlighted on selected hub.
· User can change the default 'Band Variant' of the device. The band variants gets populated based on type of the device.
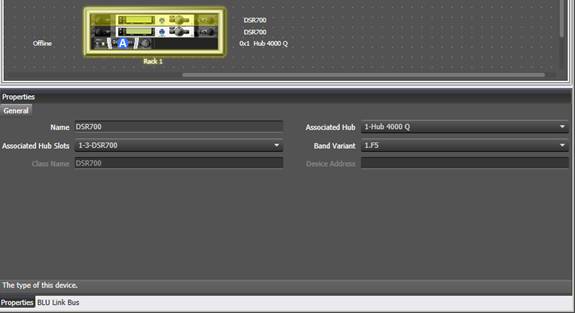
· Once Association is done the properties of the devices changes as shown in figure 8.
· To enter into Wireless Mode double click on any AKG device on venue.
Note
User should have at least one properly associated AKG device on venue to enter into Wireless mode, where user can perform all WMS product operations like Configuration, Control, Monitoring, Scans, Firmware Updates, Frequency Calculations.
The Device Address field is disabled and blank for Non-HiQnet AKG venue devices.
If all hubs added on venue are offline, user can enter into wireless mode directly by double click operation on any device, but if there is any discovered hub added, user needs to perform following steps to enter into wireless mode...
· Click one 'Go Online' button in the 'Offline Design' ribbon tab.
· It navigates user to 'Online Operate' ribbon tab.
· Click on 'Synchronize Venue' button, this enables 'Send' & 'Receive' buttons on device as well as on rack as shown in Fig 10.
· User can either 'Send' or 'Receive' settings to/from hub.
· Currently 'Send' acts as 'Receive' and not supported fully. (Will be available with subsequent releases)
· Once receive/send is done, click on 'Run Venue' button.
· From 'Run Venue', double click on any AKG device to enter into Wireless Mode
By default user enters into 'Live Mode', venue tab which shows grid like representation for entire WMS products added (installed) on venue. Figure 9. shows the typical 'Live' mode.
Note
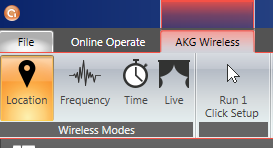
Wireless Mode have its own ribbon tab called 'AKG Wireless'.
By default wireless mode launches 'Live Mode'. 'Wireless Modes' ribbon group of 'AKG Wireless' ribbon tab consists buttons to navigate different modes of operation. User can switch to 'Live Mode' using 'Live' button. Other modes are 'Home', 'Frequency' and 'Time'.
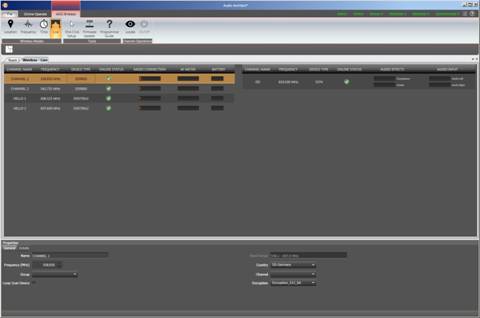
Live view is a grid like presentation of all the AKG WMS configured devices on venue. Each row in the grid represents one wireless channel. One device can have more than one channel. The grid is split into two parts. One represents all receivers and other transmitters. The channels are categorized based on whether it is wireless transmitter or wireless receiver channel. Fig. 11 shows two live view grids.
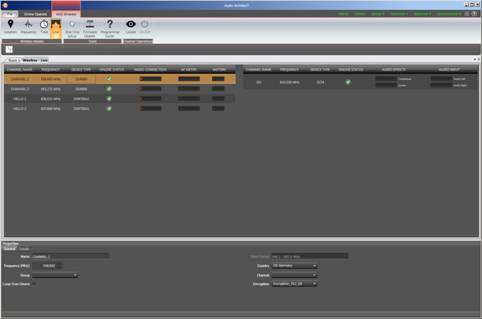
It shows information about each receiver channel of AKG WMS configured device on venue.
Channel Name: Shows name of channel. The same will be displayed on device screen.
Frequency: Frequency of the channel.
Device Type: Type of the device
Online Status: Shows online status of channel. Below shows different icons used for indicating various states of the devices.
|
Is Power Button Pressed |
Is Connected to Slot |
Icon |
|
True |
True |
|
|
True |
False |
|
|
False |
True |
|
|
False |
False |
|
Note
SST4 & SST4500 doesn't have power on/off button. Instead it have RF on/off button.
Radio Connection: Shows RF level.
AF Meter: Shows Audio Level.
Battery Level: Shows battery level of synced transmitters. In case of SR4000, if the transmitter is off, meter shows full value.
On/Off: Only works with SR type devices. will be disabled otherwise.
First four columns are similar to the receiver grid. They show similar information about transmitters.
Audio Effects: Two meters showing Compressor & Limiter levels of the transmitter.
Audio Input: The audio input to the transmitter shown in the form of two meters, one showing audio left and other audio right.
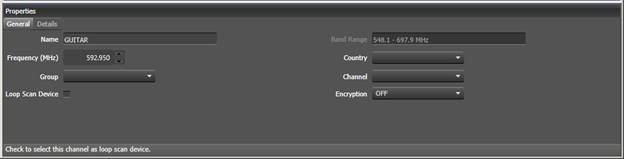
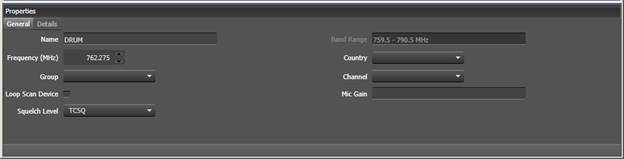
User can change properties of selected channel from Properties Tab. To edit common properties like name and frequency, a 'General' tab is provided.
Name: The name is limited by specifications (length, number of letters, supported characters) for particular device based on display screen of the device. The validation has been handled internally, so even if user enters wrong characters or lengthy name, device will be updated with a validated name.
Frequency: User can choose frequency from a given 'Band Range' by two ways. One user can change the frequency using numeric up-down control or user can choose from the presets.
Preset is a combination of 'Country - Group - Channel'. These are the standard set of frequencies provided with device as per standard calculations and hardware limitations.
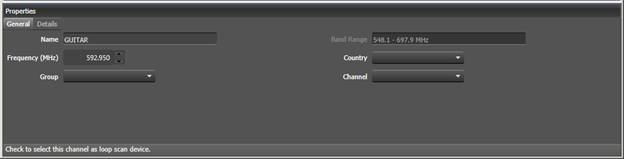
Select any DSR type channel from the first grid, the properties gets populated in Property Window as shown in Fig. 13. For DSR type devices, the only extra property in 'General' tab is...
Encryption: User can see (or set) the encryption type for the channel. Options provided are 'OFF', 'Encryption_32_bit', and 'Encryption_512_bit'.
If user selects SR type channel from the first grid, the 'General' property tab populates two extra properties related to SR.
Mic Gain: Shows gain value of transmitter.
Squelch Level: User can change squelch level by choosing any option given in drop down.
Fig. 14 shows Property window for SRs
Note
Check box property 'Loop Scan Device' is for both type of receivers. If user checks, the channel shall be used to perform environment scan in loop.
The second part of the grid enlists transmitter channels configured on venue. User can select any transmitter channel to observe properties pan. A new property called 'Radio Power' gets populated in 'General' property tab.
Radio Power: Shows radio power selected on transmitter.
This is provided to perform operations specific on IVM transmitters. Fig. 15 shows the IVM Operations property tab.
 FIGURE 15. IVM Operations property tab
Low Cut-Off Frequency: Checkbox to enable or disable low cut-off frequency. Numeric Up-down: To change the value from 10 to 300 Hz.
EQ (Equalizer), Room Simulation, Compressor: User can set different predefined values of EQ, Room Simulation & Compressor for the transmitter. Check box is to enable/disable this property.
FX Bypass: It bypasses all of above properties.
Audio Mode: User can choose audio mode for the selected channel.
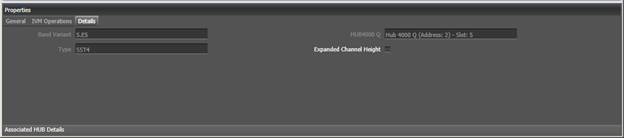
Extra information and operation on wireless channel. If user want to monitor specific channel, or want to focus on specific channel, he can increase the row width for that channel by using 'Expanded Channel Height' property provided in 'Details' tab.
Tab also shows that to which hub this channel is associated.
Tools: User can launch 'One Click Setup', 'Firmware Update' & 'Programmer Guide' from this mode. The buttons are provided under 'Tools' ribbon group as shown in Fig. 17.
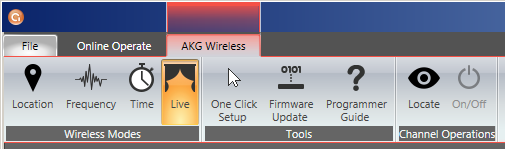
Channel Operations: Locate and On/Off operations on channel can be performed.
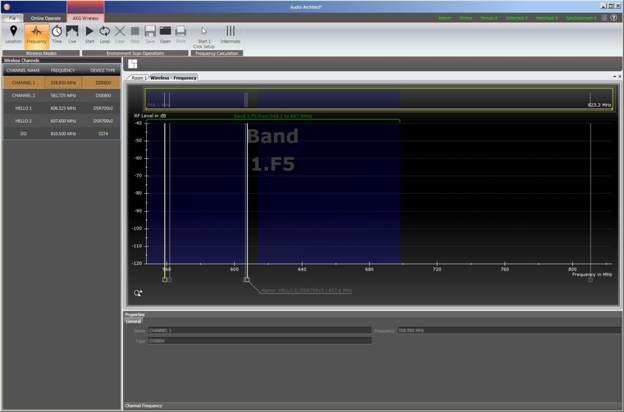
Frequency mode can be launched by clicking on 'Frequency' button from the 'AKG Wireless' tab. This mode concentrates on frequency related operation like Frequency Calculation and Environment Scan. In this mode entire wireless system is graphically represented. Every channel is symbolized with a vertical line called marker in the graph. Mode also have explorer window with grid listed with all channels as shown in Fig. 18. User can perform all environment scan operations from the ribbon group.
Frequency calculation is vital part of WMS devices. Choosing a right frequency for configured (or installed) channels is critical as well as crucial part of live usage of WMS devices. This part is very complex and not easy for normal users.
AKG provides utility called 'One Click Setup' to do this complex work for you. This utility can be launched from both Live as well as Frequency Mode by clicking button given in ribbon group.
· Launch 'One Click Setup' wizard kind of utility.
· There are two modes of frequency calculation, one normal and other expert mode. Normal mode can be started where the calculation will start with default settings, where in expert mode, user is able to add more information which can impact calculation.
· Normal Mode:
o Click green 'Start' button on the first page of calculation wizard.
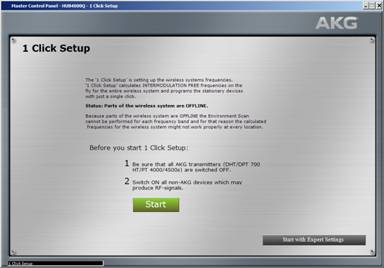
o If there are any online devices present on the venue, wizard will start the environment scan, which provides all the information about surrounding RF environment. This provides information about the regions, values which new frequencies should have.
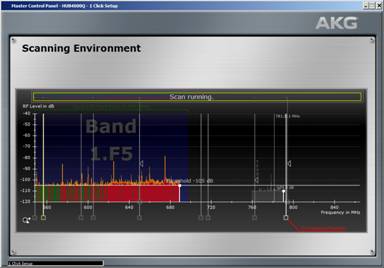
o Once the scan is done, wizard moves to calculation page, where it runs a thorough algorithm to find out intermodulation free frequencies for current requirement of the venue.

o Once the calculations are done, and algorithm finds the required number of frequencies, it shows the final page of the wizard, where you can see the summarized result of the calculation. From here user either can program the newly found frequencies by clicking on 'Program Frequencies' button, or cancel the calculation by closing the wizard.
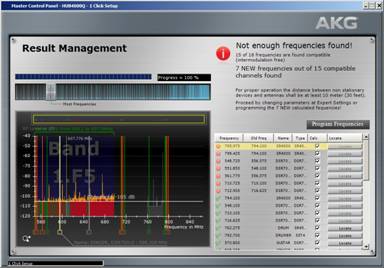
o In case algorithm didn't found the desired result, user can choose new frequencies from the 'Select Devices' page to specific devices.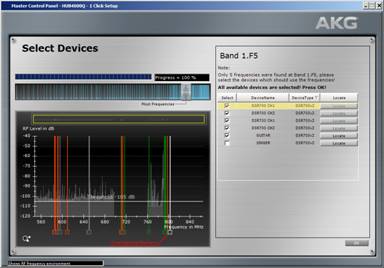
· Expert Mode:
o To enter into expert mode, user should click on 'Start with Expert Settings' button from home page of the calculation wizard.
o It launches expert page where user can enter more detailed and technical information about for the calculation.
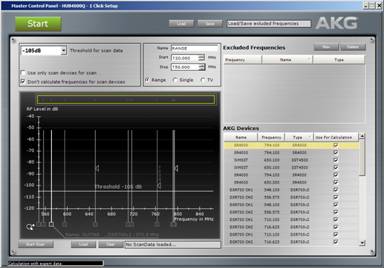
o User can add/load (saved) Expert Data (Restricted Ranges)
§ Existing TV channels
§ Known ranges
§ Known occupied single frequencies.
o User can choose devices from the list, by default all channels are considered for the calculation.
o User can load/start new environment scan.
o Once data is entered, calculation will be same as normal mode.
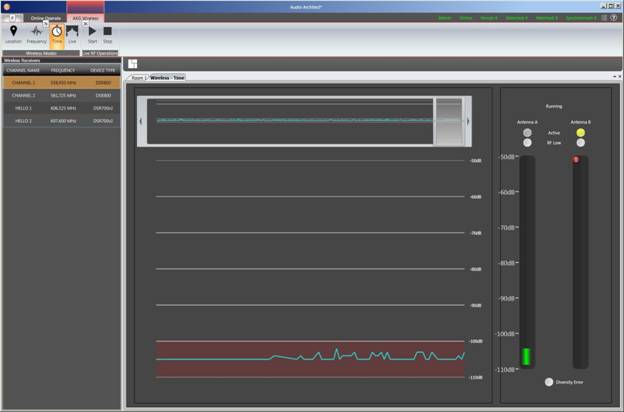
This mode can be launched by clicking 'Time' button from the 'AKG Wireless' ribbon tab. This mode is for monitoring real time RF level of all type of receivers. User can change the monitoring channel from explorer window. User can start and stop monitoring operation by using buttons provided in the ribbon group. The typical example of monitoring is as shown in Fig. 19.
· Red brown region at the bottom of the scrolling graph shows the selected squelch level.
· SR type receivers have two antennas, so two meters are used to show the antenna values.
· Zooming pan is provided at the top of the scrolling graph.
· Graph scrolls with every new value per millisecond. Total length of the time axis is 100 seconds.
· Launch firmware update utility by clicking 'Firmware Update' button from ribbon.
· Utility lists all the nodes discovered on HiQnet LAN.
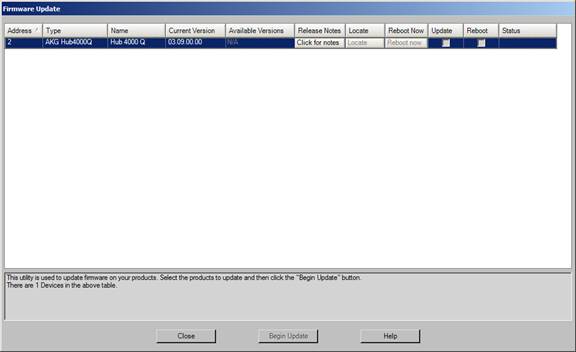
· Check the hub which needs to upgrade to the Available Version provided with the application and click on 'Begin Update'
· Before updating any non-hiqnet AKG device, make sure the HUB is updated to the latest firmware version available in the application.
· Enter into Wireless - Live Mode
· Launch firmware update utility by clicking 'Firmware Update' button from ribbon.
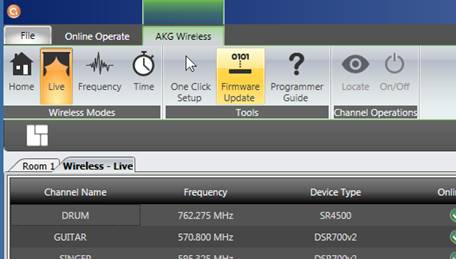
· It launches firmware utility (different than the one which updates HUB firmware)
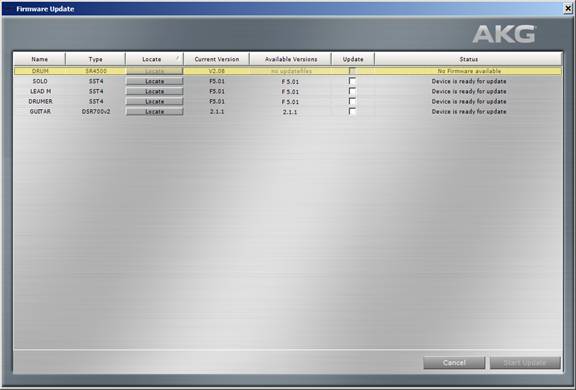
· Choose devices which needs to update to 'Available Versions'
· Click on 'Start Update' button.
The DSR firmware update happens in three stages
When user starts the update…
1. Computer screen will start showing progress in %... Before that there are few messages regarding changing device to update mode.
2. Device will show ‘FIRMWARE UPDATE…’
3. @ 33% screen will show ‘Update Completed!’
4. Device reboots
5. The update window will again try to change mode of the device to update by sending commands..
6. The progress resumes from 33%
7. Device shows ‘FIRMWARE UPDATE…’
8. @66% screen will show ‘Update Completed!’ again
9. And this time also Device will reboot
10. The update window verifies the device and will change the mode to update for the last time
11. The progress resumes from 66% on screen
12. Device will show ‘FIRMWARE UPDATE…’
13. Progress completes to 100%
14. This is the stage where we have successfully updated the firmware for DSRs
In between if user switch off either HUB or device, there is possibility that user will not get the device in AudioArchtiect.
AudioArchitect must show ‘Unidentified Device’ in the update tool window in this case.
But it is advised to let the application complete all the three stages at once.
In any wireless microphone system, frequency management is the most crucial and complex job. User (technician) needs to understand so many parameters to configure a proper intermodulation free system. AKG started working on improving the usability of the module and introduced a utility, which will help user to find TV channels installed at particular place (location) if user has information about ‘Postal Code’ (Zip Code).
· Launch AudioArchitect and navigate to ‘Live’ tab of AKG Wireless Mode.
· Click on ‘Location’ button
· It open ‘Wireless Frequency Management’ mode.
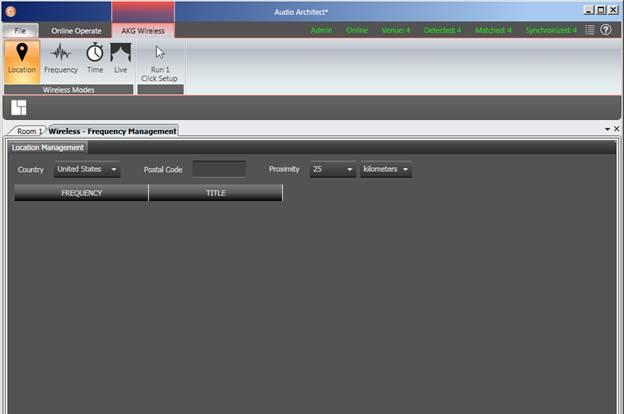
· User can enter following details to get the TV Channel information.
o Country: Select country of the location where the devices are installed or will be used
o Postal Code: Enter the postal code the venue
o Proximity: The peripheral area which needs to be scanned, user can choose 25, 50, 75 and 100 as value and ‘km’, ‘miles’ as unit.
· Once selected the information will be populated as shown below
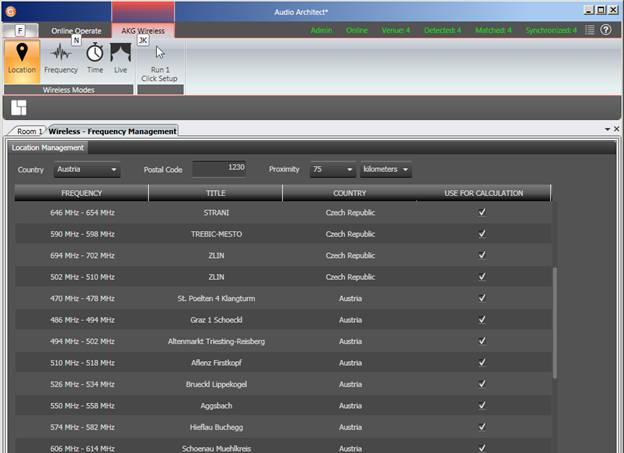
· Screen will populate all the TV channels within the proximity entered of particular postal code. Following information can be shown
o Frequency: Range of TV Channel
o Title: Name of the channel
o Country: There is possibility of getting channels from other country in a given proximity.
o Use for Calculation: Check box which user can decide whether to use for calculation. The selected one will be considered as restricted regions and will not be used for frequency allocation.
It is little confusing but checkbox decides whether the range should be used for calculation or not. The calculation is all together different aspect.
· Once found, user can click on ‘Run 1 Click Setup’ button which will launch frequency calculation wizard with incorporating the selected TV channels.
· I am not able to see my HUBs in Discovered Node tree in Devices explorer window.
ü Refer Audio Architects 'Net Setter' utility guide. User can launch net setter from ribbon button provided in Tools ribbon group.
ü Change IP settings from this utility
ü Also refer HUB4000Q setup guide for dip switch settings for IP settings
· I am not able to drag and drop discovered HUB on the venue
ü You might have locked the HUB using access control from SystemArchitect. Please change the settings for that HUB from SystemArcchitec, before using it in AudioArchitect.
· I am not able to see proper values in the Wireless - Live Mode
ü Go offline and synchronize venue by receiving values from the HUB, that way venue will be updated with the values from HUB.
· I am not able to install the downloaded build. Facing problems (or unexpected errors) while installing latest version.
ü Delete AudioArchitect folder @ C:\Program Files\Harman Pro (if any)
ü Delete C:\ProgramData\HPRO\AudioArchitect
· Mismatches are not handled completely, so in case of any issue please Do report to us.
· Do inform any suggestions regarding missing or wrong information about AKG devices.
· Contact AKG for any help/suggestions/inputs/modifications regarding this application.
The application is revamped to new UI as well as new workflow. But still we are providing some old utilities which will get replaced with new releases in phases. To avoid any mishandling please avoid following.
· If you are performing calculation or updating firmware, do not go and change any settings from any AKG Wireless mode.
· Do not start Environment scan from AKG Wireless - Frequency mode and from One Click setup - Expert mode at the same time.
· Do not use the old venue files.