

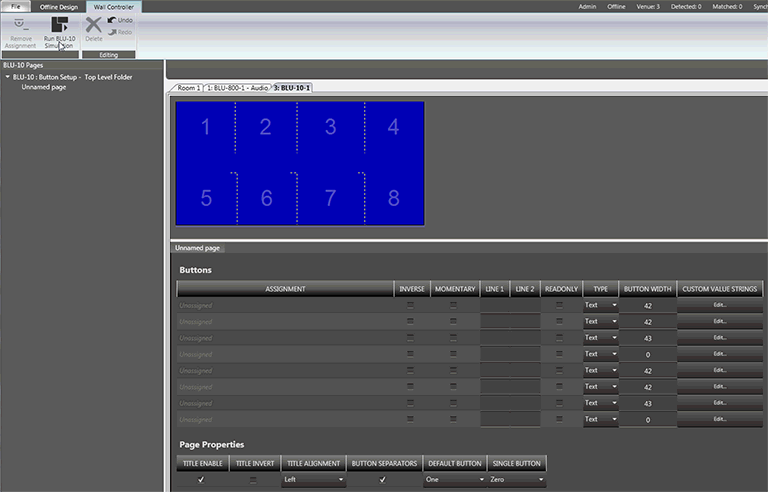
The BLU-10 is a touch screen controller with 8 configurable zones, these can display from 1 to 8 assignable "buttons." When using fewer buttons, the remaining buttons can be wider.
The BLU-10 features a touch-screen display, two hardware buttons and a rotary encoder. The display of the BLU-10 can be divided into up to eight sizeable positions where page change buttons, preset recalls or almost any parameter can be represented. Custom text, static images and animated images can be used on these positions to further enhance the user interface.
Multiple pages can be organized into a hierarchy of folders to assist with navigation. There are two methods of navigation with the BLU-10. The first method uses page change buttons on the touch-screen display to navigate between pages in the same folder. The second method uses the lower hardware button to access a hierarchical tree representation of the folders and pages within the BLU-10 implementation.
Password security can be applied to individual pages or folders ensuring that only authorized users can make changes to specific parameters when BLU-10 controllers are placed in public areas. Access rights for different types of users can be established by using multiple passwords to access different sets of system parameters.
The BLU-10 can be programmed to enter a ‘Sleep’ state after a predetermined delay time. In this state, the screen brightness assumes a predetermined reduced brightness level. ‘Active’ brightness is restored when the BLU-10 ‘wakes’ following detection by the IR proximity sensor.
Soundweb users will be familiar with the simple drag-and-drop programming interface, and the BLU-10 interface is very similar. Once the menu pages have been created, operation of the pages can be tested using the special simulation mode, which emulates how the controller will work when in use. This allows menu structures to be checked before the system goes live.
The BLU-10 connects into a Soundweb London network via an Ethernet port, either directly into the rear of a rackmount device such as the BLU-16 with a Cat 5 crossover cable or with a standard Cat 5 cable into an Ethernet switch. The unit is powered either using the terminals on the rear, accepting a range of 12V - 48V DC or with IEEE802.3af Power Over Ethernet (POE).
Double-click the BLU-10 icon in the venue to open the Wall Controller editing page.To begin assigning parameters, select the Venue Explorer tab at the bottom-left of the window. Expand the tree to view the available parameters.
Parameters may be assigned by dragging and dropping from the Venue Explorer onto either the blue button area or onto an available assignment line as shown below. Pages may also be assigned to an Assignment line.
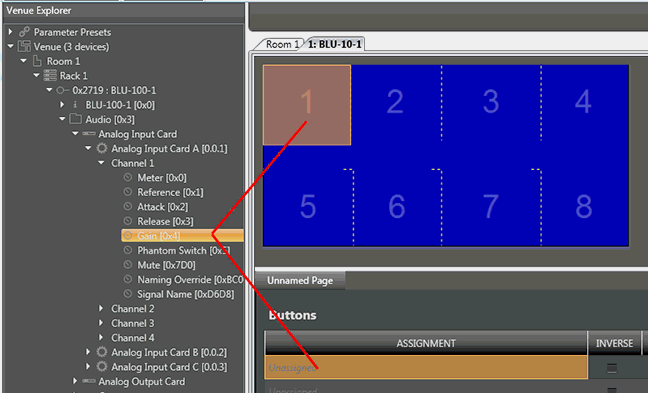

Assignment: The BLU parameter that is assigned to the button. Assignments are made by opening the Venue Explorer, then dragging and dropping parameters onto either the blue numbered area or to an Unassigned line under the Assignment header.
Inverse: When checked the button will act in the inverse to that of the Audio Architect assignment. For example, if a button is normally open - checking this box will make the button normally closed.
Momentary: When checked the button will act as a momentary rather then a latching switch
Line 1/Line 2: Put text on a button to replace the default text. If either of these fields contain text, that text will be displayed and the default text will be hidden. To restore the original, delete both these fields.
Read Only: Set to "Read Only" to prevent any changes to the control on this button. Some controls such as meters are read only by nature and therefore can not be changed even if the button is not read only. However, in order to display a value without allowing any changes to be made, check this box.
Type: Text or Meter - this indicates whether the BLU-10 screen will display text or a level meter for this assignment.
Button Width: Sets the width of the on screen button in pixels. Minimum is 7. Maximum is 127.
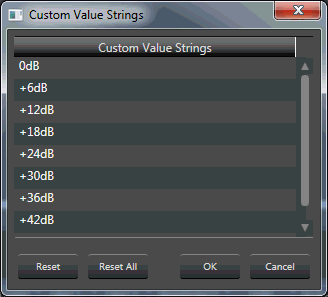
Custom Value Strings: Provides for custom values to be edited for this assignment. These strings are parameter dependent. Shown below is an example of Custom Value Strings available for a BLU analog input card Gain settings.

Title Enable: When checked the page name is shown in the center of the display.
Title Invert: When checked the page name is displayed with a white background and blue text.
Title Alignment: Aligns the page name text within the button
Button Separators: When checked, the button separators are shown on the display.
Default Button: This sets the button that the encoder controls until a different button is selected. If set to a button with a toggle control on it then it will default to the first button which can be controlled by the encoder.
Single Button: When 0 all 8 buttons are available. If only a single button is to be displayed, enter the number of that button here. this sets the button that the encoder controls until a different button is selected. If set to a button with a toggle control on it then it will default to the first button which can be controlled by the encoder.
The BLU-10 Pages tab is located next to the Venue Explorer tab at the bottom-right of the window.
To add a new page, add a new folder or rename a folder, right-click on the BLU-10: Button Setup - Top Level Folder.
To rename a page, set a page password, set a page as the Start Page, move (if available) or delete a page;
right-click on a page to open this menu:

Rename Page: Provides for renaming the selected page.
Set Page Password...: See Set Password below.
Set As Start Page: Assigns the selected page as the Start Page.
Move To Folder: Brings up a window where a page may be reassigned to a different folder.
Delete Page: Deletes the selected page.
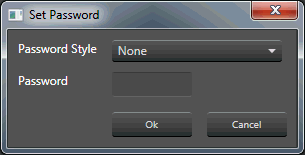
Password Style: None, Alphanumeric or Numeric
Password: Once either Alphanumeric or Numeric is chosen, type the password here.
When a password has been set for a page, the following virtual keypad comes up when the page is to be opened:
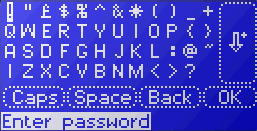
Send a copy of the configuration file to BSS Audio Support (http://bssaudio.com/en-US/support) for the password to be extracted.

Sleep Brightness: Sets the level of brightness once the BLU-10 has gone into sleep mode.
Start Page Enable: Enables the start page (on by default). When off, the Start Page Delay is grey.
Active Brightness: Sets the level of brightness when the BLU-10 is active.
Start Page Delay: Sets how long the BLU-10 can be inactive before it jumps back to the start page. This only occurs if the Start Page has been enabled.
Sleep Enable: Enables Sleep mode where after a time of inactivity, set by the Sleep Delay, the BLU-10 display will adjust brightness to the level set by the Sleep Brightness control.
Contrast: Sets the BLU-10 display contrast.
Sleep Delay: Sets the amount of time of inactivity before the BLU-10 adjusts the brightness level.

Once the menu pages have been created, the operation of the BLU-10 pages can be tested using the special simulate mode that shows how the controller will work when in use, thus ensuring the correct menu structures are in place before the system goes live. BLU-10 simulation is activated by clicking the Run BLU-10 Simulation button in the ribbon.
Click on the touch zones to select operation of the configured controls and presets.
The two buttons enable navigation through a nested menu structure if multiple pages have been created. The bottom button leads to a menu structure displaying the pages for selection by the rotary, the top button acts as a 'Cancel Navigation' button, cancelling the current dialog and routing the BLU-10 back to the previous selected page.
The simulation can be stopped by right clicking on the virtual BLU-10 and selecting 'End Simulation'.
