JBL DrivePack® devices all have a total of 20 user accessible EQ filters available for system tuning. All EQ parameters can be accessed and controlled by an assortment of button controls or Drag-and Drop features as well as an EQ Graphical Editor and EQ Filter Editor control set.
All EQ functions are directly visible. Control functions in the EQ control panel are activated by Drag-and-Drop mouse control in the graphic EQ display field or via a series of buttons or text edit/spinner controls. Single clicking the control buttons toggles the associated function.
The EQ control panel and sub-panel provides the user with full control of the device by using graphical controls for the following functions:
JBL DrivePack® devices all have a total of 20 user accessible EQ filters available for system tuning. The 20 filters are divided into 2 banks of 10 filters each and are assigned to either the System EQ filter bank or the Guest filter bank. The System and Guest button control toggles the EQ Graphical Editor to either show the System EQ filters or the Guest EQ filters.
System EQ Filters – Button control allows the System Engineer user to select, view and adjust the bank of ten (10) System EQ filters.
Guest EQ Filters – Button control allows the Mixing Engineer to select, view and perform personal, subjective tonal adjustments to the bank of ten (10) Guest EQ filters.
This button control activates an EQ response curve which shows the combined effect of all filters selected for both the System and Guest EQ filter mode. The combined frequency response is denoted by an orange EQ response curve.
This button control resets all ten (10) active filters back to 0 dB gain and nominal Q.
This button control restores the previous filter gain and Q parameters for all ten (10) filters.
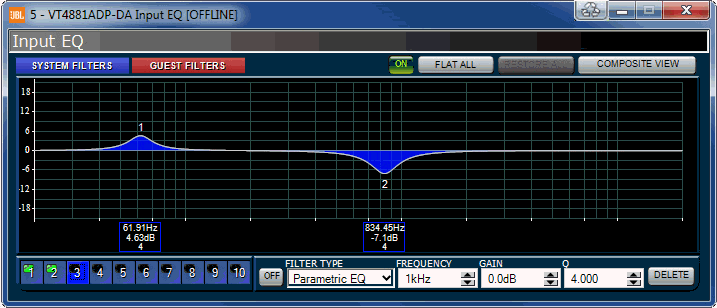
The user can modify the EQ filter parameters in an intuitive way by using the EQ Graphical Editor. The user can use the mouse to individually modify both the gain and Q on any of the ten (10) EQ filters in real-time. As the filter is adjusted in the Editor the parameters are modified in the audio DSP to give real-time audio feedback. The frequency scale of the EQ Graphical Editor is logarithmic. The EQ Graphical Editor displays either the System or Guest EQ filters depending on the state of the System/Guest EQ Filter control buttons.

Gain Adjustment - The gain of a filter can be adjusted by selecting the circle handle of the desired filter and moving it up or down to the desired gain level.
Center Frequency (fc) Adjustment - The center frequency (fc) can be adjusted by selecting the circle handle of the desired filter and moving it left or right to the desired center frequency (fc).
Filter Q Adjustment - The filter Q can be adjusted by selecting the square handle on either side of the circle handle of the associated filter and moving it left or right to increase or decrease the filters Q.
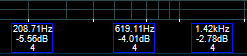
Directly under the individual EQ filter(s) in the EQ Graphical Editor there is an associated EQ Filter Data Box. The data displayed in the box represents the filters center frequency, gain and Q. The box is orange if the filter is active and in Edit mode. The box is black if the filter is active and not in Edit mode. The box is white if the filter is in Bypass mode. Clicking an individual EQ Filter Data Box will put that EQ filter into Edit mode. The individual EQ Filter Data Boxes can be moved up or down the frequency spectrum to change the center frequency (fc) of the associated EQ filter.

This bank of 10 button controls allows the user to individually control the mode of any of the ten (10) EQ filters. Each filter can be in-use (Used) or selected (Select), enabled (Enable) or bypassed (Bypass).
The delete control button allows the user to delete an EQ filter that has been selected.

The user can adjust all parameters of a selected filter using the EQ Filter Editor control set. The user can modify the filter type, center frequency (fc), gain and filter Q for a selected filter.
Filter Type – The filter type drop-down control lists and allows selection of any of the following filter types
Parametric EQ (filter Q=4)
LP Shelf 6 dB/Oct
HP Shelf 6 dB/Oct
LP Shelf EQ
HP Shelf EQ
LP Butterworth 6 dB/Oct
HP Butterworth 6 dB/Oct
LP EQ
HP EQ
Center Frequency (fc) – The filter center frequency control allows the user to increase or decrease center frequency by clicking the up or down arrow. The user can also edit this parameter directly by clicking on the parameter and modifying the number with the keyboard then pressing "Enter" to activate the change.
Gain – The filter gain control allows the user to increase or decrease gain by clicking the up or down arrow. The user can also edit this parameter directly by clicking on the parameter and modifying the number with the keyboard then pressing "Enter" to activate the change.
Q – The filter Q control allows the user to increase or decrease filter Q by clicking the up or down arrow. The user can also edit this parameter directly by clicking on the parameter and modifying the number with the keyboard then pressing "Enter" to activate the change.