The Operator Advanced panel is visible to the user when the icon for the JBL Device within Venue View is activated. This is the default panel for digital control and monitoring of JBL DrivePack devices.
The Operator Advanced panel is visible to the user when the icon for the JBL Device within Venue View is activated. This is the default panel for digital control and monitoring of JBL DrivePack devices.
The Operator Advanced panel provides the user with full control of the device by using graphical controls and can be described over four general functions:
Menu Tool Bar
Online/Offline Indicator
Device Presets
Amp Enabled/Disabled Control
To access the control and processing blocks provided in the module, double clicking the processing block or button will either open a new sub-panel or cause an existing window to be recycled. The objects available are:
Signal Generator - Available on all JBL devices.
General - Available on all JBL devices.
Input Routing - Available on all JBL devices.
Input Compressor - Available on all JBL devices.
Input Delay - Available on all JBL devices.
Sub Filter - Available on all JBL devices.
Output Gain Spinner Control
Mute Indicator/Control
Amplifier Load Monitoring
Output Gain Fader
Output Meter
Clip indicator
Output Gain Reduction Meter
The functions in this section are accessed directly from the main control panel.
The title bar indicates the HiQnet address and speaker type of the device.
The menu bar on the Main Control panel has four menus headings with drop down sub-menus that provide various functions. The exact look of the panel will vary if the device is being individually controlled. See help for Menus for more detailed information.
Label contents notifies the user of the status of the device.
The Preset sub-control panel allow the user to store and recall 10 user configurable presets.
A preset is a snapshot of all the parameters in the unit. Presets are saved or recalled by using the buttons located on the control panel.
Pressing the recall button will bring up a dialog box that allows selection of the preset to be recalled from the drop down box.
When a parameter value has changed in a preset, the store button will light. Upon hitting the store button, the store dialog pops up. It allows you to specify a location and change the name of the preset. Pressing the OK button will store the preset. Cancel will cancel the operation, including the renaming of the preset. See help for Presets for more detailed information.This button control allows the user to put the amplifier in standby mode while the device is still online. Network access to the device is available when the device is Disabled.
See help for Common Controls for more detailed information on the above topics.
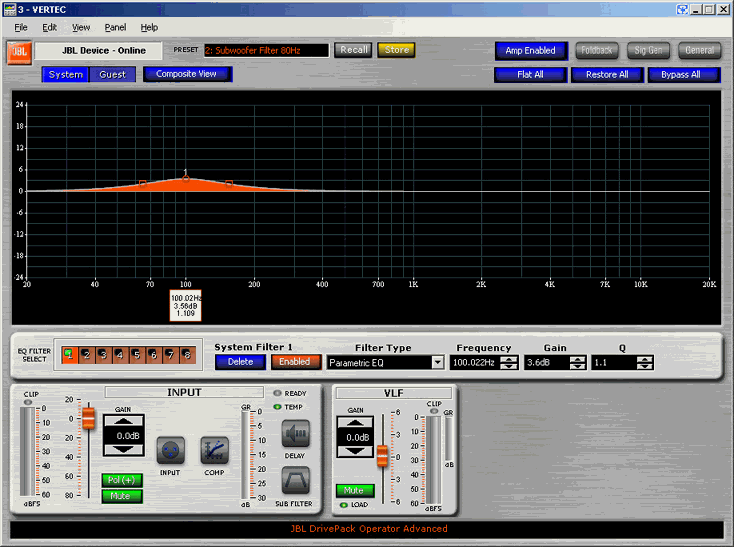
JBL DrivePack® devices all have a total of 16 user accessible EQ filters available for system tuning. All EQ parameters can be accessed and controlled by an assortment of button controls or Drag-and Drop features as well as an EQ Graphical Editor and EQ Filter Editor control set. All EQ functions are directly visible. Control functions in the EQ control panel are activated by Drag-and-Drop mouse control in the graphic EQ display field or via a series of buttons or text edit/spinner controls. Single clicking the control buttons toggles the associated function.
See help for EQ Graphic Control Panel for more detailed information on any of the EQ functions outlined in this section.
This button control activates an EQ response curve which shows the combined effect of all filters selected for both the System and Guest EQ filter mode. The combined frequency response is denoted by an orange EQ response curve.
This button control resets all eight (8) active filters back to 0 dB gain and nominal Q.
This button control restores the previous filter gain and Q parameters for all eight (8) filters.
This button control deactivates all filters in the active EQ section. The filters stay in place but are not applied to the input signal. When the EQ is in bypass mode the filter buttons are colored orange to represent their inactive state and the graphic representation of the filters in the EQ Graphical Editor are colored gray.
The EQ Graphical Editor provides an intuitive method to modify EQ filter parameters. The user can use the mouse to individually modify both the gain and Q on any of the eight (8) EQ filters in real-time. As the filter is adjusted in the Editor the parameters are modified in the audio DSP to give real-time audio feedback. The frequency scale of the EQ Graphical Editor is logarithmic. The EQ Graphical Editor displays either the System or Guest EQ filters depending on the state of the System/Guest EQ Filter control buttons.
Each of the eight (8) EQ filters can be modified directly on the EQ Filter Display.
Directly under the individual EQ filter(s) in the EQ Graphical Editor there is an associated EQ Filter Data Box. The data displayed in the box represents the filters center frequency, gain and Q.
The EQ Filter Select/Enable bank of 8 button controls allows the user to individually control the mode of any of the eight (8) EQ filters. Each filter can be in-use (Used) or selected (Select), enabled (Enable) or bypassed (Bypass).
The Delete control button allows the user to delete an EQ filter that has been selected.
The user can adjust all parameters of a selected filter using the EQ Filter Editor control set. The user can modify the filter type, center frequency (fc), gain and filter Q for a selected filter.
See help on the Input Control and Monitor Sub-Panel for more detailed information on any of the functions outlined in this section.
The Input Control and Monitor Sub-Panel is used to configure the input block of the amplifier. Controls, metering, status display, and processing blocks are provided in the Input sub-panel. The device input Gain control, input level meter, gain reduction meter, Clip,Temp and Ready indicators are directly accessible from the input sub-panel. Double clicking the processing block or button will either open a new window or cause an existing window to be recycled. The objects available are:
The Clip Indicator (above the Input Meter) indicates that either the analog or digital signal input level is clipping.
The Input Meter Indicates the signal level into the analog or digital inputs of the input module in dBFS from –60 dBFS to 0 dBFS. The meter also displays both RMS and Peak signals superimposed.
This control allows the user to adjust the signal level into the amplifier module. The user can use the mouse to increase and decrease the gain by moving the gain slider control up or down or clicking on the up and down arrows of the gain control until the desired gain is attained. The user can also edit this parameter directly by clicking on the gain parameter and modifying the number with the keyboard then pressing "Enter" to activate the change. Adjustment range is –80 dB to 20 dB.
The input gain spinner control allows precision incremental control in 0.5dB steps by clicking on the UP or Down tabs. The spinner control also allows a numerical gain value to be input directly into the text field.
Polarity Indicator - Shows the polarity of the Input.
Polarity Control - Polarity can be toggled Positive or Negative by clicking the polarity button.
Mute Indicator - Shows Mute status.
Mute Control - Button toggles the Mute function by clicking the Mute/Muted button.
User can double-click on the INPUT button control to configure the input for the device.
The user can double-click on the COMP button control to configure input compression for the device. When the COMP button control is double-clicked the user is presented with the DrivePack® Input Compression control panel.
The Gain Reduction Meter indicates the level of reduction of the output of the input amplifier in dB, from –60 dB to 0 dB, in the event the factory set protection limiters go active. The protection limiters go active when the output signal exceeds normal range.
The Ready Indicator indicates that the input module is ready to process input signals.
Green – Indicates the self test has completed successfully and that the input module is ready for processing input signals.
Red – Indicates the self test is in progress and that the input module is not ready for processing input signals.
The Temperature Indicator indicates the temperature of the input module.
Green – Device is within the defined normal operating temperature.
Yellow – Device temperature is above defined normal operating conditions and is within the first stages of thermal limiting.
Red – Device temperature is in advanced stages of thermal limiting and within the thermal shut down range. Action should be taken immediately to correct the external conditions causing the condition.
The user can double-click on the DELAY button control to configure input delay. When the DELAY button control is double-clicked the user is presented with the Input Delay control panel.
Double clicking the Sub Filter control button opens a graphic High Pass/LoPass filter control sub panel. The Sub Filter controls allow the user the fine tune the top-box-to-subwoofer crossover region and provides both a graphical interface and direct value entry. For more details click Sub Filter.
See help on Output Control and Monitor Sub-Panel for more detailed information on any of the functions outlined in this section.
This sub-panel is used to configure and monitor the output section of each discrete amplifier output channel. Each individual JBL DrivePack amplifier channel is optimized for the specific bandpass application to which it is assigned.
The output gain spinner control allows precision incremental control in 0.5dB steps by clicking on the UP or Down tabs. The spinner control also allows a numerical gain value to be input directly into the text field.
The Amplifier Load Monitor continuously monitors the loudspeaker loading and indicates if the load is out of factory specifications.
Green – Loudspeaker load is within defined nominal range.
Yellow - Loudspeaker load is above defined nominal range, i.e. open circuit.
Red – Loudspeaker load is below defined nominal range, i.e. short circuit.
This control allows the user to adjust the signal level of the amplifier output module assigned to it. The user can use the mouse to increase and decrease the gain by moving the gain slider control up or down or clicking on the up and down arrows of the gain control until the desired gain is attained. The user can also edit this parameter directly by clicking on the gain parameter and modifying the number with the keyboard then pressing Enter to activate the change. Adjustment range is –6 dB to 6 dB.
The Clip Indicator (above the Output Meter) indicates that either the analog or digital signal input level is clipping.
Indicates the signal output level of the assigned amplifier output module in dB from –60 dB to 20 dB. The meter displays both RMS and Peak signals superimposed.
Shows the output gain reduction in dB from –60 dB to 0 dB. Gain Reduction becomes active when the output signal exceeds the normal limits that are factory set to protect the audio equipment.