
Master control panels give users the ability to manage multiple like devices with a single control panel. They are brand-specific factory panels that come with Audio Architect. You must have more than one like device in order to utilize Master Control Panel.
A device may be added to multiple master control panels
Device settings may still be controlled by the device's own device panel
Current device settings will be affected by the most recent panel used, including the device's own device panel
A new main window tab is created when a master control panel is generated
NOTE: Each device has its own properties and settings; see individual device help for more information.
To create a Master Control Panel, select the first device you wish added to the Master Control Panel.
Shown selected here is the top Crown I-Tech HD in a rack of four.
NOTE: For this example, each of the four I-Tech HD amplifiers have different output level settings.
Then click on the New button in the Panels section of the Ribbon. This will bring up the selection window:
 In this example we'll select I-Tech HD Factory Master.
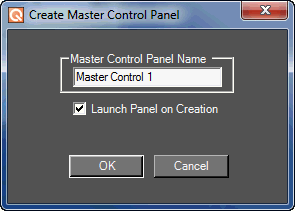 Name the Master Control Panel and select whether or not you wish to launch the panel on creation.
Click OK to create the panel.
To Add the remaining three amplifiers to the Master Control Panel, first highlight the next amplifier in the rack then select Add Devices in the Panels window.
Shown here:
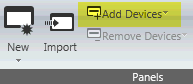 NOTE: Click Remove Devices if you wish to remove the device from the Master Control Panel.
Continue Adding Devices until you have all the devices you want added to the Master Control Panel.
To activate the Master Panel, double click on the Master Panel name in the Panels section of the Ribbon.

Note that there are four color designations for each of the level settings in this particular example.
Here the Master Control Panel will control the Levels of the four amplifiers.