
After mounting the Contrio server properly in the rack and applying power, basic configuration is required. How the network is configured will determine which method should be used.
There are basically three options to choose from:
1) 1. Self Addressing (a network without a DHCP server or static IP addresses)
2) 2. Automatic Addressing (a network with a DHCP server)
3) 3. Static IP addresses (the IP addresses are assigned manually)
No matter which option is chosen, Audio Architect 1.90.1 or higher is required to configure the device and update to the latest firmware. The direct connect method is the best way to verify the most basic of communications.
Ports Gb1 and Gb2 are functionally identical. By default both ports have HiQnet control enabled, but only one port has Dante enabled. It is not possible for the configuration process to pre-determine which port will have Dante enabled. For that reason it is necessary to confirm which port Dante is using. Typically it is port GB2.
If the built-in Media Engine is not required, and therefore the use of Dante, skip this next section and refer directly to configuring the HiQnet port.
Determining Dante port
To determine the Dante port, a computer running Audinate's Dante Controller software is required. The software is free to download from http://www.audinate.com.
Connect the controller PC to port GB2 on the Server directly with a Category 5E or better cable.
If the computers are not on, power them up and wait approximately 60 seconds for the addressing process to take place.
Verify that there are amber or green LEDs on the rear of the Contrio server at GB2. This indicates that you have a connection between your computer and the server. If the indicators are not illuminated or flashing, check that the cables are seated fully and that the adapter is enabled on the computer.
Launch Dante controller.
If Dante Controller discovers the Contrio Server, the Dante port has been confirmed.
6. If Dante Controller does not discover the Contrio Server, move the LAN cable to the other Gb port on the server. Allow time for the address process to take place. After approximately 90 seconds the HiQnet Contrio Server should appear in the Dante Controller software.
7. If the Dante Interface of the Contrio Server is not found on either port, check the computer firewall settings to verify that Dante Controller is not being blocked and repeat the process.
This approach to addressing is the simplest, but may take up to two minutes for all of the negotiations to take place after the boot up of the server and computer.
With both the computer and the server turned off, using a Category 5E or higher cable, directly connect the computer to port GB1 on the rear of the server. The port on the server has auto sensing so it will function with either a straight or crossover RJ45 cable.
Apply power to both the Server and the computer and allow them to boot up. There is no user intervention needed for the server other than applying power. The server will be ready to function after the boot up cycle.
Verify that there are amber and green LEDs lit on the rear of the Contrio server at GB1. This indicates that there is a connection between the computer and the server. If the indicators are not illuminated or flashing, check that the cables are seated fully and that the adapter is enabled on the computer.
After verifying connection, launch HiQnet NetSetter from the computer's Start Menu.
5. NetSetter may have selected a wrong PC adapter. This will keep the computer from connecting to the Server. In the upper left hand corner of the NetSetter window, locate the PC Adapter drop-down menu that lists the IP addresses of the computer. Select the IP address that begins with 169.254.x.x. The last two numbers will vary. If this address is not shown as one of the options, verify that the network is enabled and the cables are properly connected.
6. If the HiQnet Contrio Server is not found, check the computer firewall settings to verify that HiQnet Netsetter is not being blocked and repeat the process.
7. After selecting the correct network interface wait up to one minute while the software discovers the address of the Contrio Server. Once it has been discovered it will appear in the table within Netsetter. The Status column should say Discovered if everything is correct. If the status column does not say Discovered, ensure that the DHCP/Auto-IP is checked for the server. If it is not, click to enable it and then at the bottom of the window click Apply Current Edits.

8. Next move the LAN cable to Gb2. Wait approximately 90 seconds then choose ‘Rescan Network’ in NetSetter, then configure your Gb2 port accordingly. This should be the Dante port. Select the settings appropriate to Dante operation.
9. Communication between the computer and the Server has now been established.
10. Launch Audio Architect.
11. Close the Options window as it has been verified that communication between the computer and the Contrio Server has been established. The Contrio Server should appear in the Discovered devices. Drag it into the venue file. NOTE: If the HiQnet Contrio Server is not found, check the computer's firewall settings to verify that HiQnet Audio Architect is not being blocked and repeat the process.
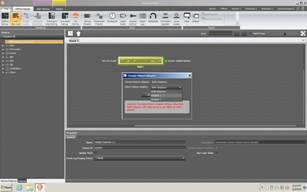
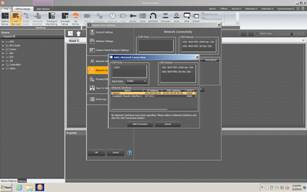
12. Right click on the Contrio server and select “Change HiQnet Adapter”.
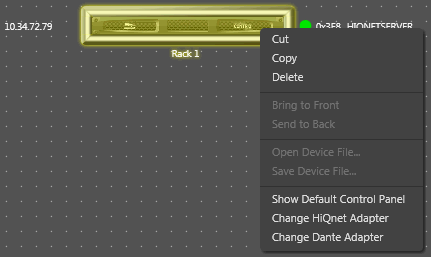
13. In the resulting window from the drop down menu select, Adapter 1. This step configures the Server to send all the HiQnet control traffic through GB1. Note: If Dante is on Gb1, it is recommended that this is set this to Adapter 2 so as to separate HiQnet from Dante.
The configured Contrio Server may now be connected to the control and Dante networks. If it is the same network, this splitting of the network cards simplifies the configuration of Dante.
1. With both the computer and the Server turned off, using a Category 5E or higher cable, directly connect the computer to a network switch that is connected to the DHCP server. Also connect the Server port GB1 to the same network.
2. Apply power to both the Server and the computer and allow them to boot up. The server will be ready to function after the boot up cycle.
3. Verify that the amber and green LEDs are lit on the rear of the Contrio server at GB1. This indicates that there is a proper connection between the switch and the server. If the indicators are not illuminated or flashing, verify that the cables are fully seated or replace the cable.
4. After verifying connection, launch HiQnet NetSetter from the computer's Start Menu.
5. NetSetter may have selected a wrong PC adapter. This will keep the computer from connecting to the Server. In the upper left hand corner of the NetSetter window, locate the PC Adapter drop-down menu that lists the IP addresses of the computer. Select the IP address that is not 127.0.0.1. If additional address other than this are not listed, verify that the network is enabled and the cables are properly connected.
6. After selecting that network interface wait up to one minute while the software discovers the address of the Contrio Server. Once it has been discovered it will appear in the table within NetSetter. The Status column should say Discovered if everything is correct. If the status column does not say Discovered, ensure that the DHCP/Auto-IP is checked for the server. If it is not, click to enable it and then at the bottom of the window click Apply Current Edits.
7. If the HiQnet Contrio Server is not found, check the computer's firewall settings to verify that HiQnet NetSetter is not being blocked and repeat the process.
8. Next move the LAN cable to Gb2, wait approximately 90 seconds and then choose ‘Rescan Network’ in NetSetter. Now configure the Server Gb2 port accordingly. This should be the Dante port, choose the settings appropriate to Dante operation.
9. Communication between the computer and the Server has now been established.
10. Launch Audio Architect
11. If Audio Architect has not been opened previously, the software will open a few windows in order to configure itself. Make sure to select the proper network adapter as was done in step 5.
12. Close the Options window as it has been verified that communication between the computer and the Contrio Server has been established. The Contrio Server should appear in the Discovered devices. Drag it into the venue file. NOTE: If the HiQnet Contrio Server is not found, check the computer's firewall settings to verify that HiQnet Audio Architect is not being blocked and repeat the process.
13. Right click on the Contrio server and select “Change HiQnet Adapter”

14. In the resulting window select, Adapter 1. This configures the Server to send all the HiQnet control traffic through GB1. Note: If Dante is on Gb1, it is recommended that this setting be changed to Adapter 2 so as to separate HiQnet from Dante.
The configured Contrio Server may now be connected to the control and Dante networks. If it is the same network, this splitting of the network cards simplifies the configuration of Dante.
1. With the server turned off, using a Category 5E or higher cable, directly connect the configuring computer to GB1 or to a switch if preferred.
2. Apply power to the Server and allow it to boot up. The server will be ready to function after the boot up cycle.
3. Verify that the amber and green LEDs are lit on the rear of the Contrio server at GB1. This indicates that you have a connection with the server. If the indicators are not illuminated or flashing, check that the cables are fully seated or replace the cable.
4. After verifying connection, on the computer launch HiQnet NetSetter from the Start Menu.
5. NetSetter may have selected a wrong PC adapter. This will keep the computer from connecting to the Server. In the upper left hand corner of the NetSetter window, locate the PC Adapter drop-down menu that lists the IP addresses of the computer. Select the IP address that the computer is using. If additional addresses are not listed, verify that the network is enabled and the cables are properly connected.
6. After selecting the proper network interface, wait up to one minute while the software discovers the address of the Contrio Server. Once it has been discovered it will appear in the NetSetter grid. NOTE: If the HiQnet Contrio Server is not found, check the computer's firewall settings to verify that HiQnet NetSetter is not being blocked and repeat the process.
7. The Server may not fully populate and will have information of the IP address but not the description. The Server and the computer being on different networks cause this situation.
8. In the table, edit the IP information for the server to the desired IP address.
9. Click Apply Current Edits at the bottom of the NetSetter window.
10. The Status column should say Discovered after approximately 60 seconds if everything is correct. If this is not the case, make sure that there are unique IP addresses for every device, verify that the information has been entered correctly and the Apply Current Edits button has been clicked.
11. Next move the LAN cable to Gb2, wait approximately 90 seconds and then choose ‘Rescan Network’ in NetSetter. Now configure the Server Gb2 port accordingly. This should be the Dante port, choose the settings appropriate to Dante operation.
12. Communication between the computer and the Server has now been established.
13. Launch Audio Architect
14. If Audio Architect has not been opened previously, the software will open a few windows in order to configure itself. Make sure to select the proper network adapter as was done in step 5.
15. Close the Options window as it has been verified that communication between the computer and the Contrio Server has been established. The Contrio Server should appear in the Discovered devices. Drag it into the venue file. NOTE: If the HiQnet Contrio Server is not found, check the computer's firewall settings to verify that HiQnet Audio Architect is not being blocked and repeat the process.
16. Right click on the Contrio server and select “Change HiQnet Adapter”
17. In the resulting window select, Adapter 1. This configures the Server to send all the HiQnet control traffic through GB1. Note: If Dante is on Gb1, it is recommended that this setting be changed to Adapter 2 so as to separate HiQnet from Dante.
The configured Contrio Server may now be connected to the control and Dante networks. If it is the same network, this splitting of the network cards simplifies the configuration of Dante.