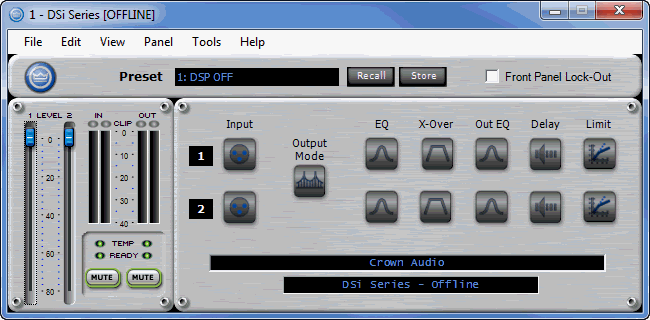
The main starting point for all control of the DSi amplifiers is done from the general panel. The general panel is the first panel that appears when the amplifier is opened. The exact look of the panel will vary if the device is being individually controlled or in a Master Panel. This variance also includes the controls that are included on the Master Panel. There are also two ways to view the panel, Basic or Normal. These views or selected from the View Menu.
The panel has five main control areas:
In the basic view, all of the basic amplifier controls are available, including:
This control mutes the signal at the final stage of the path – immediately prior to output.
These fader controls let you manually set the output level for both channels of the amplifier. This value refers to the final output attenuation and may be adjusted from -80 to 0 dB.
Displays the “raw” (before attenuation) input level. The DSi series of amplifiers returns this level on a scale from -40 to 0 dB.
Displays the output level of the component for both channels on a scale from -60 to 0 dB.
Above the Input and Output Meters for each amplifier channel is an LED that turns on when a channel signal is experiencing clipping.
The Thermal Status indicator will display one of three colors. The indicator will display green if the amount of thermal headroom used is less than 59%. It will display yellow is the amount of thermal headroom is between 60% and 80%, and it will display red if the amount of thermal headroom is greater than 81%.
This indicates when the amplifier is turned on and ready to pass signal.
When the amplifier control panel is in the Normal View, one can access the processing in the amplifier. To access the Control and Processing Blocks provided in the module, double click the processing block or button. This will either spawn a new window or cause a window to be recycled. The objects available for both channels are:
When double clicking the Stereo/Bridge Mono button, to change from Stereo to Bridge the following screen appears:
You will need to click the apply button to make the change. This is to make sure you did not accidentally hit the button and cause damage to your amp or speakers. You will notice that once you change the mode, the view will change.
You can lock-out the front panel of the amplifier by clicking the box next to Front Panel Lock-Out. Once you lock-out the front panel from the software, you are unable to unlock it from the front panel of the amplifier. It must be unlocked from the software.
However, the attenuators will still function.
If you are connected to the Internet you can find additional information, including video overviews at:
http://www.crownaudio.com/tutorials/